Tengdu Claude við Business Central
origo-bc tengir Claude Desktop við Origo
Business Central MCP-þjón. Eitt plugin sem virkar
í bæði Cowork og Code.
Connect Claude to Business Central
origo-bc wires Claude Desktop up to the Origo
Business Central MCP server. One plugin that works
in both Cowork and Code.
Hvað færðu
- Regla (
origo-bc-accounting) sem kennir Claude Origo BC verkflæðið — nafnrými, tengisnið, uppfærslureglur. - Þróunarregla (
origo-bc-cloud-events) sem hleður Cloud Events API skilgreiningum, skilaboðategundum og dæmum í gegnum MCP-þjóninn. /origo-bc-setup— tengihjálp við fyrstu uppsetningu./origo-bc-add-env— bæta við BC-umhverfi./origo-bc-list-environments— sýna öll tengd umhverfi./origo-bc-switch-company— breyta sjálfgefnu fyrirtæki.
Áður en þú byrjar
Node.js 18 eða nýrra
Bæði Cowork og Code nota lítið Node-ferli til að tengjast. Athugaðu hvort Node sé uppsett:
node --versionEf skipunin finnst ekki, sæktu LTS-útgáfu frá nodejs.org og endurræstu Claude Desktop á eftir.
Uppsetning
Tvær leiðir til að setja upp — GitHub Marketplace er ráðlögð og virkar í bæði Cowork og Code.
GitHub Marketplace Ráðlögð
Sett upp í gegnum claude CLI. Virkar í
bæði Cowork og Code og uppfærist auðveldlega.
Sækja .plugin skrá
Handvirk niðurhal á .plugin-skrá. Nytsamlegt
ef þú vilt ekki nota CLI eða ert í Cowork.
Leið A — GitHub Marketplace (ráðlögð)
Þú þarft claude CLI á PATH. Ef þú ert
ekki með það, settu það upp fyrst:
macOS
# Homebrew (ráðlagt)
brew install claude

# eða npm
npm install -g @anthropic-ai/claude-code
Windows
npm install -g @anthropic-ai/claude-codeAthugaðu uppsetningu:
claude --versionKeyrðu svo tvær skipanir:
claude plugin marketplace add businesscentralal/origo-bc-plugin
claude plugin install origo-bc@origo-bc
Fyrri skipunin skráir origo marketplace-ið.
Seinni sækir nýjustu origo-bc útgáfuna og setur
hana upp í ~/.claude/plugins/. Endurræstu
Claude Desktop eða opnaðu nýtt spjall svo skilgreiningarnar
hleðst inn.
Uppfærsla:
claude plugin update origo-bc@origo-bc
Til að fjarlægja: claude plugin uninstall origo-bc
Uppsetning í gegnum Cowork viðmót
Ef þú ert í Cowork geturðu líka sett upp plugin-ið beint í viðmótinu án CLI. Hér eru skrefin:
Í hliðarstikunni í Cowork, smelltu á Customize.
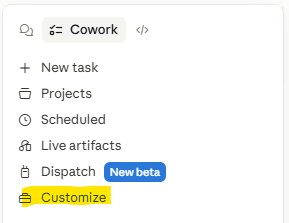
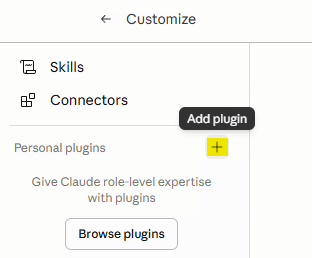
Smelltu á + við hliðina á Personal plugins eða Add plugin hnappinn.
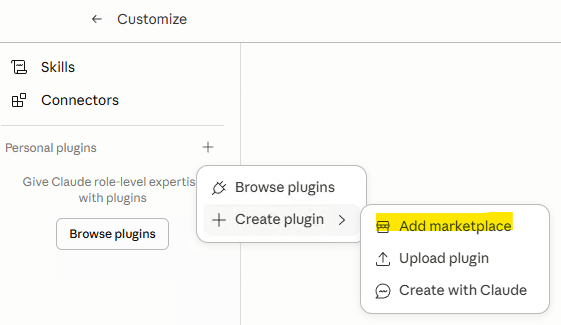
Smelltu á Create plugin → Add marketplace.
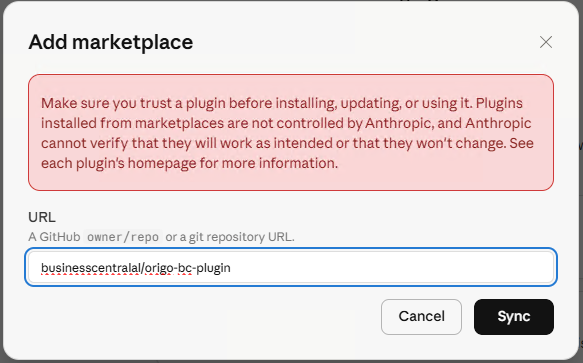
Í URL reitinn, sláðu inn: businesscentralal/origo-bc-plugin og smelltu á Sync.
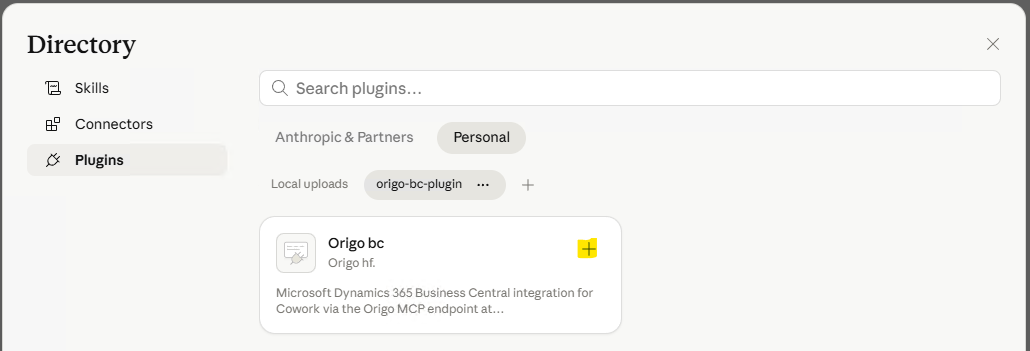
Plugin-ið birtist undir Personal flipanum sem Origo bc frá Origo hf.
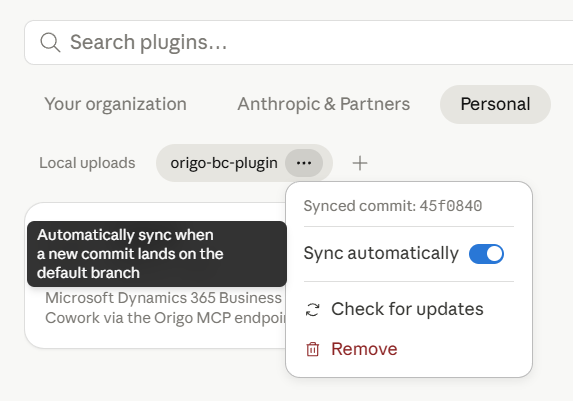
Smelltu á … við hliðina á plugin-inu og kveiktu á Sync automatically. Þá uppfærist plugin-ið sjálfkrafa þegar ný útgáfa birtist.

Opnaðu plugin-ið og smelltu á Install. Þú sérð 6 skills sem fylgja með.
Opnaðu nýtt spjall og sláðu inn /origo-bc-setup til að tengja við Business Central.
Leið B — Sækja .plugin skrá
Sæktu skrána í vafra (Edge, Chrome, Firefox — ekki inni í Claude) og dragðu hana í Cowork spjall.
Sækja origo-bc.plugin Eða velja útgáfu →
Uppsetning í Cowork:
- Opnaðu File Explorer og farðu í
Downloads. - Opnaðu nýtt Cowork spjall.
- Dragðu
origo-bc.pluginbeint í innsláttarreitinn. - Smelltu á Send. Ekki hætta við.
- Claude svarar með uppsetningakorti — smelltu á Install.
Eða í gegnum stillingar: Settings → Plugins → Install from file og veldu skrána.
Entra App Registration
MCP-þjónninn á dynamics.is/api/mcp auðkennir gegn
Microsoft Entra (áður Azure AD). Tvær
auðkenningarleiðir eru studdar — veldu þá sem hentar:
Client Secret
Forritið keyrir sjálfstætt (unattended). MCP-þjónninn
notar app_access réttindi. Hentar fyrir
sjálfvirkan aðgang.
Device Code
Notandinn skráir sig inn með eigin aðgangi. Hentar þegar notandi vill tengjast í gegnum sinn BC-aðgang.
Device Code leiðbeiningar →Client Secret uppsetning
Þetta er bestu leiðin þegar MCP-þjónninn á að keyra sjálfstætt (client credentials) án innskráningar notanda.
1. Skráðu nýtt app í Azure
- Opnaðu portal.azure.com → Microsoft Entra ID → App registrations → New registration.
- Name:
BC Web Service Clienteða sambærilegt. - Supported account types: Accounts in this organizational directory only (Single tenant) dugar í flestum tilvikum.
- Redirect URI: skildu eftir autt.
- Smelltu á Register.
2. API permissions
- Farðu í API permissions → Add a permission.
- Veldu Dynamics 365 Business Central.
- Veldu Application permissions →
app_access. - Smelltu á Add permissions.
- Smelltu á Grant admin consent for <tenant> og staðfestu.
3. Client secret
- Certificates & secrets → Client secrets → New client secret.
- Lýsing: t.d.
Claude MCP. Gildir: 12–24 mánuðir. - Smelltu á Add. Afritaðu gildið strax — það birtist aldrei aftur.
4. Afritaðu þessi gildi
- Tenant ID — Overview → Directory (tenant) ID.
- Client ID — Overview → Application (client) ID.
- Client Secret — gildið frá skrefi 3.
Farðu svo í BC-skráning hér að neðan.
Device Code uppsetning
Þetta hentar þegar notandi vill tengjast í gegnum sinn eigin BC-aðgang (delegated access). Ekkert client secret þarf.
1. Skráðu nýtt app í Azure
- Opnaðu portal.azure.com → Microsoft Entra ID → App registrations → New registration.
- Name:
BC Claude - Device Codeeða sambærilegt. - Supported account types: Accounts in this organizational directory only (Single tenant).
- Redirect URI: veldu
Public client/native (mobile & desktop) og sláðu inn:
https://businesscentral.dynamics.com/OAuthLanding.htm - Smelltu á Register.
2. Leyfa public client flows
- Farðu í Authentication flipann.
- Neðst, undir Advanced settings: Allow public client flows → Yes.
- Smelltu á Save.
3. API permissions
- Farðu í API permissions → Add a permission.
- Bættu við eftirfarandi Delegated réttindum:
Dynamics 365 Business Central
Financials.ReadWrite.All— Delegated (les/skrifa BC gögn).user_impersonation— Delegated (aðgangur sem notandi).
Microsoft Graph (valkvætt)
User.Read— Delegated (lesa notandaupplýsingar).
- Smelltu á Grant admin consent for <tenant> og staðfestu.
4. Afritaðu þessi gildi
- Tenant ID — Overview → Directory (tenant) ID.
- Client ID — Overview → Application (client) ID.
Ekkert client secret þarf — device code flæðið notar
offline_access scope við token-beiðni.
Farðu svo í BC-skráning hér að neðan.
BC-hlið — skráðu forritið og veittu réttindi
Þetta skref er eins fyrir bæði Client Secret og Device Code.
- Opnaðu Business Central sem admin-notandi.
- Leitaðu (Alt+Q) að Microsoft Entra Applications og opnaðu síðuna.
- New → fylltu út:
- Client ID: Application (client) ID frá Azure.
- Description: stutt lýsing.
- State: Enabled.
- Í User Permission Sets flipanum, bættu við:
Lágmarks réttindi
CLOUD EVENTS API— Cloud Events Base / System. Nauðsynlegt.D365 BASIC— Base Application / System. Grunnréttindi.
Gagnareglur (eftir notkun)
SUPER (DATA)— fullur aðgangur. Ekki nota fyrir þriðja aðila.- Eða afmarkaðar reglur:
D365 READ+D365 SALESo.s.frv.
- Smelltu á Grant Consent (efst á síðunni).
- BC vísar þér á Microsoft — skráðu þig inn sem admin og samþykktu.
/origo-bc-add-env.
Fyrsta tenging
Opnaðu nýtt spjall og sláðu inn:
/origo-bc-setupHjálpin biður um:
- MCP URL —
https://dynamics.is/api/mcpsjálfgefið. - Tenant ID — Directory (tenant) ID frá Azure.
- Client ID — Application (client) ID frá Azure.
- Client Secret — gildið sem þú afritaðir (aðeins Client Secret leið).
- Environment — Production, Sandbox eða nafn (t.d. cronus).
- Company name — eins og það birtist í BC.
Bæta við fleiri umhverfum
/origo-bc-add-envSkipta um sjálfgefið fyrirtæki
/origo-bc-switch-companySýna allt tengt
/origo-bc-list-environmentsÚrræðaleit
node: command not found
Node.js er ekki á PATH. Settu upp LTS frá nodejs.org og endurræstu Claude Desktop.
MCP-tólin birtast ekki
Lokaðu Claude Desktop alveg (táknið í kerfisbakka → Quit) og opnaðu aftur. MCP-þjónar sækjast aðeins við ræsingu.
Rangt fyrirtæki í svörum
Keyrðu /origo-bc-switch-company og veldu rétt
fyrirtæki.
„Unauthorized“ frá MCP-þjóninum
Auðkenning er útrunnin eða röng. Keyrðu
/origo-bc-setup aftur og sláðu inn nýja auðkenningu.
Útgáfur
Nýjasta slóðin er alltaf endurskrifuð við hverja útgáfu. Ef þú vilt festa þig við tiltekna útgáfu, notaðu slóð á borð við:
Útgáfunúmerið má finna í plugin.json innan
.plugin-skrárinnar.
Aðstoð
Hafðu samband við service@origo.is ef þú finnur villu eða þarft hjálp við tengingu. Viðbótin er opinn hugbúnaður frá Origo hf. og allir notendur Business Central mega nota hana.
What you get
- An always-on rule (
origo-bc-accounting) that teaches Claude the Origo BC workflow — namespaces, connection formats, update rules. - A development rule (
origo-bc-cloud-events) that loads the Cloud Events API definitions, message types, and examples via the MCP server. /origo-bc-setup— first-time connection wizard./origo-bc-add-env— add additional BC tenants./origo-bc-list-environments— list everything connected./origo-bc-switch-company— change the default company.
Before you start
Node.js 18 or newer
Both Cowork and Code drive the connection through a small Node process. Check your install:
node --versionIf the command isn't found, grab the LTS build from nodejs.org and restart Claude Desktop afterwards.
Installation
Two ways to install — GitHub Marketplace is recommended and works in both Cowork and Code.
GitHub Marketplace Recommended
Installed via the claude CLI. Works in
both Cowork and Code with easy updates.
Download .plugin file
Manual download of the .plugin file. Useful
if you prefer not to use the CLI or are in Cowork.
Option A — GitHub Marketplace (recommended)
You need the claude CLI on your PATH. If you
don't have it, install it first:
macOS
# Option A — Homebrew (recommended)
brew install claude

# Option B — npm
npm install -g @anthropic-ai/claude-code
Windows
# npm (requires Node.js 18+)
npm install -g @anthropic-ai/claude-code
Verify the install:
claude --versionThen run two commands:
claude plugin marketplace add businesscentralal/origo-bc-plugin
claude plugin install origo-bc@origo-bc
The first command registers the origo marketplace. The
second pulls the latest origo-bc build and installs
it into ~/.claude/plugins/. Restart Claude Desktop
(or open a new session) so the definitions load.
Updating:
claude plugin update origo-bc@origo-bc
To remove: claude plugin uninstall origo-bc
Installing via the Cowork UI
If you're in Cowork, you can also install the plugin directly through the UI — no CLI needed. Here are the steps:
In the Cowork sidebar, click Customize.
Click the + next to Personal plugins or the Add plugin button.
Click Create plugin → Add marketplace.
In the URL field, type: businesscentralal/origo-bc-plugin and click Sync.
The plugin appears under the Personal tab as Origo bc by Origo hf.
Click the … next to the plugin and turn on Sync automatically. This keeps the plugin up to date whenever a new version is published.
Open the plugin and click Install. You'll see 6 skills included.
Open a new chat and type /origo-bc-setup to connect to Business Central.
Option B — Download .plugin file
Download the file in a web browser (Edge, Chrome, Firefox — not inside Claude) and drop it into a Cowork chat.
Download origo-bc.plugin Or pick a pinned version →
Install in Cowork:
- Open File Explorer / Finder and go to
Downloads. - Open a new Cowork chat alongside it.
- Drag
origo-bc.plugindirectly into the chat input. - Hit Send. Don't cancel.
- Claude replies with an install card — click Install.
Or via Settings: Settings → Plugins → Install from file and pick the file.
Entra App Registration
The MCP server at dynamics.is/api/mcp authenticates
against Microsoft Entra (formerly Azure AD).
Two authentication methods are supported — choose the one that
fits your scenario:
Client Secret
The app runs unattended using client credentials. The MCP
server uses app_access application permissions.
Best for automated access.
Device Code
The user signs in with their own account. Best when individual users connect via their own BC credentials.
Device Code setup →Client Secret setup
Use this when the MCP server should run unattended (client credentials flow) without a signed-in user.
1. Register a new app in Azure
- Open portal.azure.com → Microsoft Entra ID → App registrations → New registration.
- Name:
BC Web Service Clientor similar. - Supported account types: Accounts in this organizational directory only (Single tenant) works for most setups.
- Redirect URI: leave blank.
- Click Register.
2. API permissions
- Go to API permissions → Add a permission.
- Select Dynamics 365 Business Central.
- Select Application permissions →
app_access. - Click Add permissions.
- Click Grant admin consent for <tenant> and confirm.
3. Create a client secret
- Certificates & secrets → Client secrets → New client secret.
- Description: e.g.
Claude MCP. Expires: 12–24 months. - Click Add. Copy the value immediately — it won't be shown again.
4. Copy the values you need
- Tenant ID — Overview → Directory (tenant) ID.
- Client ID — Overview → Application (client) ID.
- Client Secret — the value from step 3.
Then proceed to BC-side registration below.
Device Code setup
Use this when individual users should connect using their own BC credentials (delegated access). No client secret is needed.
1. Register a new app in Azure
- Open portal.azure.com → Microsoft Entra ID → App registrations → New registration.
- Name:
BC Claude - Device Codeor similar. - Supported account types: Accounts in this organizational directory only (Single tenant).
- Redirect URI: pick
Public client/native (mobile & desktop) and enter:
https://businesscentral.dynamics.com/OAuthLanding.htm - Click Register.
2. Allow public client flows
- On the app, open the Authentication tab.
- At the bottom, under Advanced settings: Allow public client flows → Yes.
- Click Save.
3. API permissions
- Go to API permissions → Add a permission.
- Add the following Delegated permissions:
Dynamics 365 Business Central
Financials.ReadWrite.All— Delegated (read/write BC data).user_impersonation— Delegated (access-as-user).
Microsoft Graph (optional)
User.Read— Delegated (read user profile).
- Click Grant admin consent for <tenant> and confirm.
4. Copy the values you need
- Tenant ID — Overview → Directory (tenant) ID.
- Client ID — Overview → Application (client) ID.
No client secret needed — the device code flow uses the
offline_access scope at token time.
Then proceed to BC-side registration below.
BC side — register the app and grant permissions
This step is the same for both Client Secret and Device Code.
- Open Business Central signed in as an admin user.
- Search (Alt+Q) for Microsoft Entra Applications and open the page.
- New → fill in:
- Client ID: paste the Application (client) ID from Azure.
- Description: a short name.
- State: Enabled.
- On the User Permission Sets tab, add:
Minimum permissions
CLOUD EVENTS API— Cloud Events Base / System. Required.D365 BASIC— Base Application / System. Baseline BC access.
Data permissions (pick based on use)
SUPER (DATA)— full access. Don't use for third parties.- Or scoped sets: e.g.
D365 READ+D365 SALESetc.
- Click Grant Consent (top bar).
- BC redirects to Microsoft — sign in as a tenant admin and approve.
/origo-bc-add-env.
First connection
Start a fresh chat / session and type:
/origo-bc-setupThe wizard asks for:
- MCP URL —
https://dynamics.is/api/mcpby default. - Tenant ID — Directory (tenant) ID from Azure.
- Client ID — Application (client) ID from Azure.
- Client Secret — the value you copied (Client Secret path only).
- Environment — Production, Sandbox, or a named sandbox.
- Company name — as it appears in BC.
Adding more environments
/origo-bc-add-envChange the default company
/origo-bc-switch-companyList everything connected
/origo-bc-list-environmentsTroubleshooting
node: command not found
Node.js isn't on PATH. Install LTS from nodejs.org and restart Claude Desktop.
MCP tools don't show up
Quit Claude Desktop fully (tray icon → Quit) and relaunch. MCP servers are only loaded at startup.
Wrong company in answers
Run /origo-bc-switch-company and pick the right
one.
"Unauthorized" from the MCP server
Credentials expired or were wrong. Run
/origo-bc-setup again and paste fresh credentials.
Versions
The latest URL above is overwritten on every release. If you need to pin a specific version, use a URL like:
Version numbers live in plugin.json inside the
.plugin file — whatever is linked at the top
of this page is always the latest release.
Support
Reach service@origo.is if you hit a bug or need help connecting. The plugin is published by Origo hf. and is free for anyone using Business Central.